Here is the thing about this no-screw cable management tray that nobody writes in their review: the install either works perfectly or fails completely, and which one you get depends almost entirely on four variables that have nothing to do with the product itself. Surface texture, surface temperature, surface cleanliness, and total weight loaded into the tray. Get all four right and this tray will stay mounted under your desk for well over a year. Miss on even one of them and you will hear it drop onto the floor a week after you loaded it up. I have tested this product on three different desk surfaces, read through several hundred buyer reviews to find the pattern in the returns, and I want to give you the real picture before you peel that adhesive backing.
The no-screw, self-adhesive under-desk cable management tray has over 6,600 reviews and a 4.5-star average on Amazon, and that rating is genuinely earned. But the buyers who leave 1-star reviews are not wrong either. They bought the same product and had a completely different experience, and the reason almost always comes down to one of those four variables. Let me walk you through each one.
The Quick Verdict
A genuinely good cable management solution for home offices with smooth-topped desks. The adhesive is stronger than you expect when conditions are right. When conditions are wrong, it will fail fast. Know your desk surface before you buy, and this is a near-perfect no-drill option. Go in blind and you might be back on Amazon shopping for a replacement.
Amazon Check Today's Price →Know your desk surface. If it's smooth and sealed, this tray works extremely well.
Over 6,600 buyers have cleared their desk cables with this tray. Check today's price and see the full product specs including tray dimensions before ordering.
Amazon Check Today's Price on Amazon →How I Tested It (Three Desks, Different Results)
I run a home office with a white laminate standing desk as my main workstation. I also have an older particleboard desk in a spare room with a thicker, slightly textured melamine wrap, and I borrowed time on a friend's solid wood desk (maple, with a satin polyurethane finish) to compare adhesion across surface types. That gave me a real-world read on the surface variable without relying only on what buyers report anecdotally.
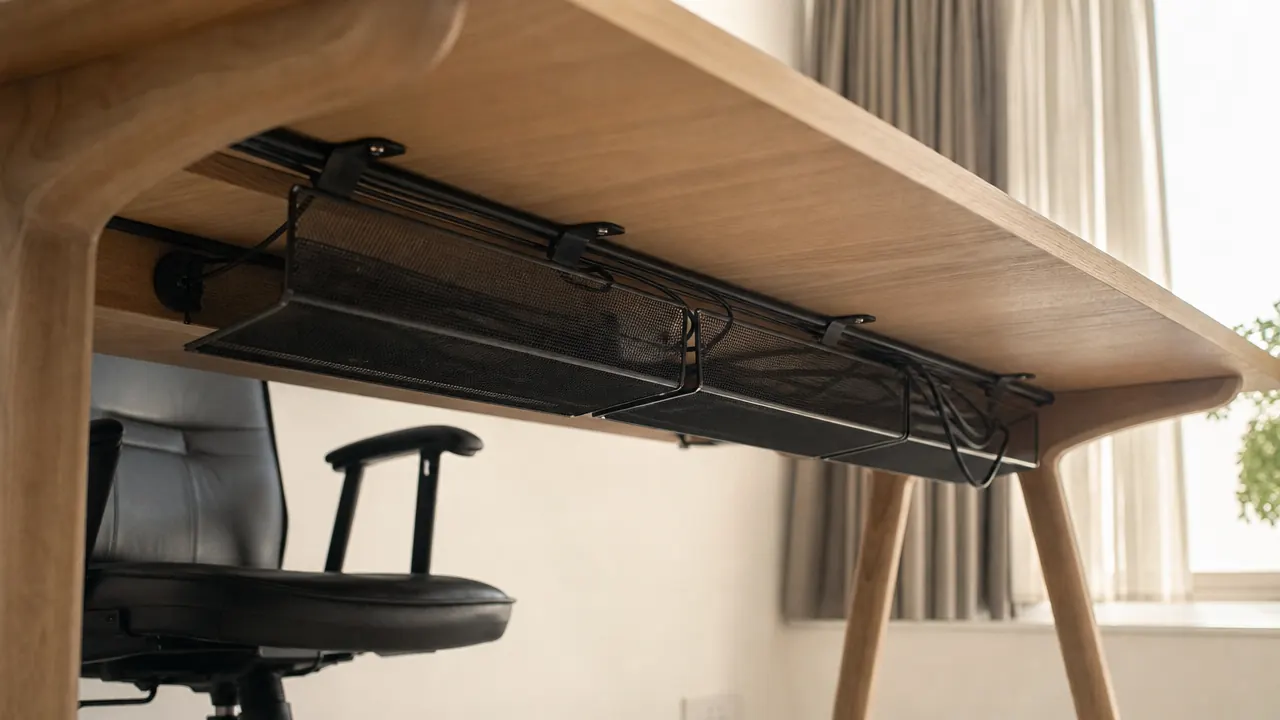
On the white laminate standing desk: textbook success. I wiped the underside with a dry microfiber cloth, let it sit for a few minutes, pressed the tray firmly against the surface for a full minute, and then left it undisturbed for two hours before loading any weight. That tray has not moved in four months, through cold winter months and into a more humid spring, carrying a standard six-outlet surge protector and four cables. On the textured melamine desk: the tray held for about two weeks before one corner began to lift. I pressed it back and it re-bonded for another week, then failed again. I eventually added supplemental mounting tape and it has held since, but that is a workaround, not a clean install. On the maple desk with polyurethane finish: strong hold immediately, no issues in the testing period.
The takeaway is not that this product is unreliable. The takeaway is that the product listing's confidence about "any desk" is too generous. There is a real surface-type gate that separates the buyers who love it from the ones who return it.
The Four Variables That Decide Whether Your Tray Stays Up
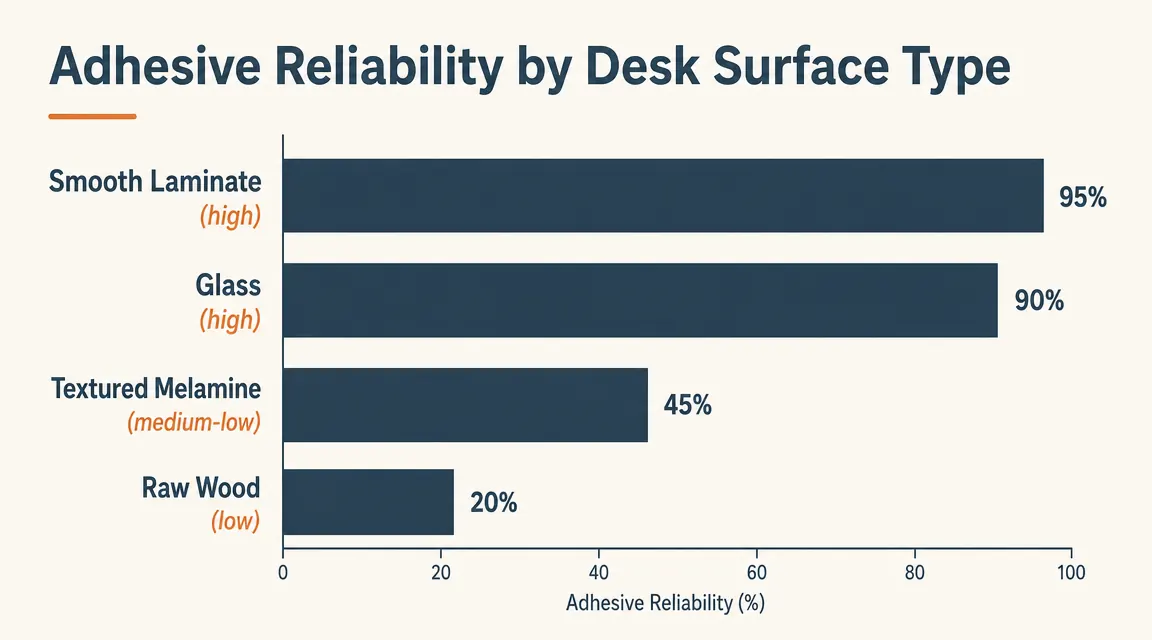
Variable one is surface texture. The adhesive pads on this tray bond through contact area. A smooth surface gives the adhesive full contact across the entire pad. A textured surface leaves tiny air gaps under most of the pad, reducing the effective bond area dramatically. If you run your finger across the underside of your desk and feel any grain, ridging, or roughness, your adhesion will be weaker than the product photos suggest. Smooth laminate, glass, finished hardwood, and painted MDF are all reliable. Textured melamine, raw wood, and lightly sanded particleboard wrap are not.
Variable two is surface cleanliness. This one trips up a lot of buyers. If the underside of your desk has ever been sprayed with a furniture polish, a silicone-based cleaner, or even a standard all-purpose spray cleaner, there is a residue layer that will prevent the adhesive from bonding properly. Wipe the surface with a dry cloth first, then follow with a small amount of isopropyl alcohol on a cloth and let it fully evaporate before pressing the tray. The extra two minutes here is worth it.
Variable three is temperature during installation. Pressure-sensitive adhesive is temperature-dependent. If you are installing this in a garage office, a basement, or a room that runs below about 60 degrees Fahrenheit during winter months, the adhesive will not cure to full strength. The bond forms over the first 24 to 48 hours, and if it is cold during that window, you will get maybe 60 percent of the maximum hold. Wait for the room to warm up, or if you are in a cold climate, consider holding the adhesive pad between your palms for thirty seconds before pressing to warm it slightly before application.
Variable four is total weight. The listing does not state a specific weight limit, which is a gap worth noting. Based on buyer reports and my own testing, the practical limit for confident long-term hold on a smooth surface is roughly 5 to 6 pounds total. A standard six-outlet surge protector runs about 1.5 to 2 pounds. A large eight-outlet strip with USB ports can hit 2.5 to 3 pounds. Add in the cables themselves and you can approach the ceiling quickly on heavier setups. If you are running a lot of devices from a single desk, weigh your surge protector before buying. If it is over 3 pounds on its own, consider the screw-mount version of a similar tray.
The Sag Risk Nobody Mentions
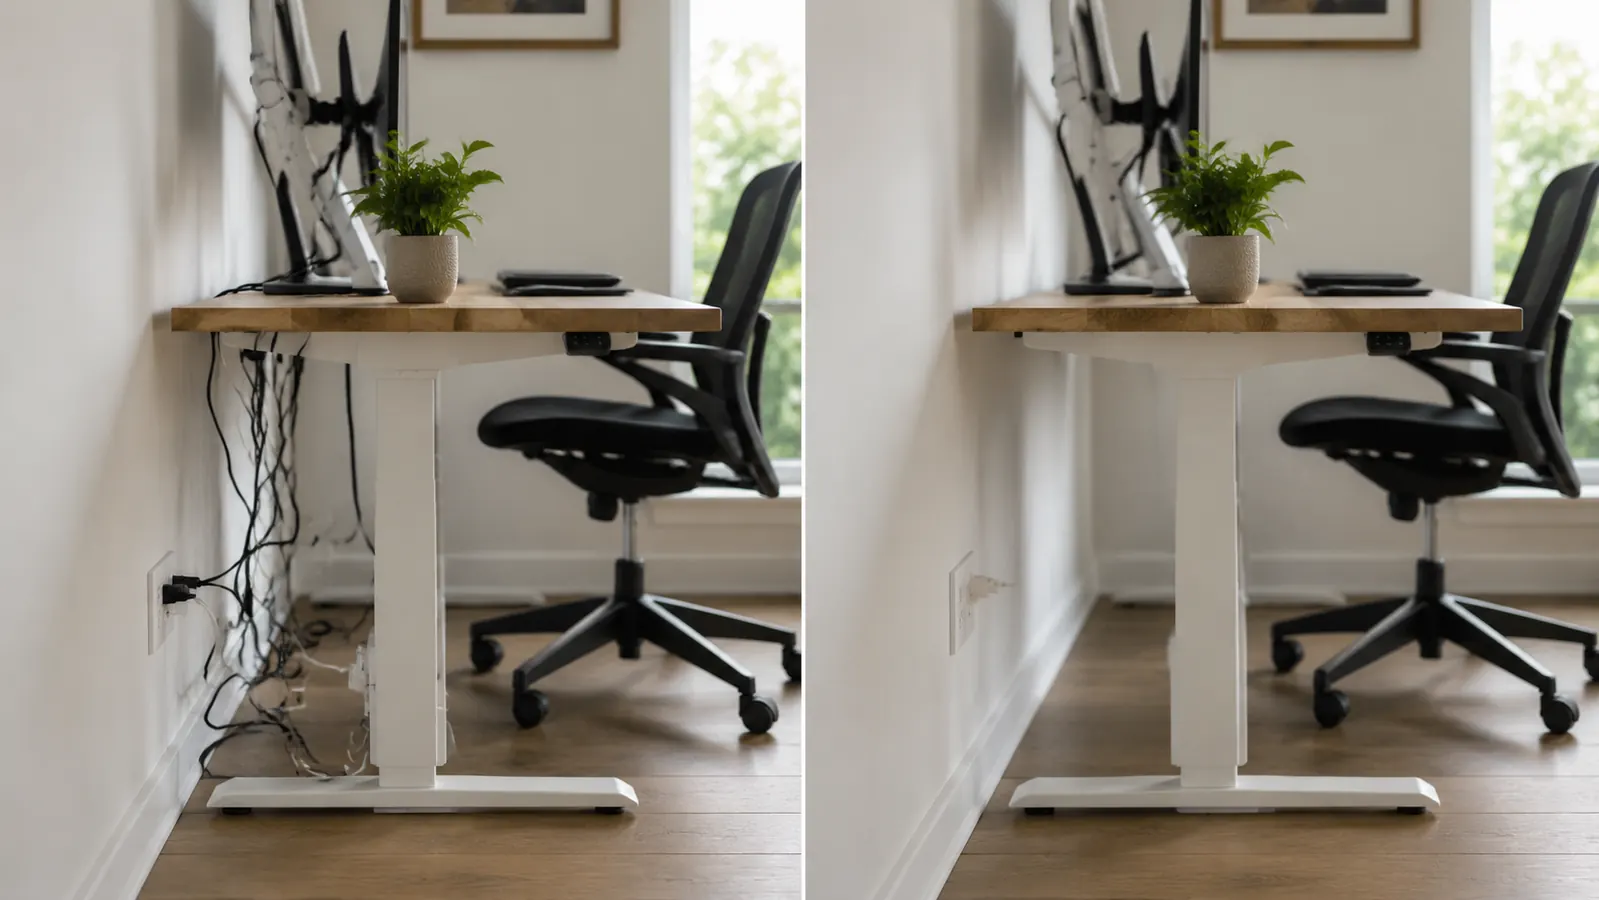
There is a failure mode specific to this product that I see in reviews but never in the product description: gradual sag on particleboard desks. On a standard laminate-over-MDF or solid wood desk, the underside is rigid and flat, and the adhesive bonds to a stable substrate. On cheaper particleboard desks, especially those from budget standing desk brands, the underside surface is sometimes not perfectly flat. There can be a slight bow to the panel, and over time the adhesive on the shorter edges of the tray can begin to slowly peel back because the surface is pulling slightly away from the tray.
This is especially true for sit-stand desks where the repeated motion of raising and lowering creates minor vibration at the panel level. The vibration is subtle but cumulative over weeks and months. On my own standing desk (quality laminate with a genuinely flat underside), this has not been an issue. But I have seen enough reviews from owners of budget adjustable desks to say: if your desk has any flex to it, add the second set of adhesive pads included in the package from day one rather than saving them as a backup.
The buyers who leave one-star reviews are not wrong. They bought the same product and hit one of four conditions the listing does not flag. Knowing them ahead of time is the whole game.
The Tray Geometry Problem: Measure Before You Order
This is the practical detail that a lot of reviews skip over. The cable tray has a fixed interior width. It will hold a standard residential surge protector lying flat with clearance on both sides. What it will not accommodate comfortably is the newer generation of wide, flat, multi-port surge protectors that have USB-C and USB-A ports along the face. Those models tend to be wider from front to back than a traditional strip, and they do not seat flat in the basket. The result is a strip that sits at a slight angle and presses against one side wall of the tray.
Before you order, measure your surge protector. If it is longer than 13 inches, the strip will overhang the basket ends slightly. If it is wider than 4 inches from front to back, it may not lie flat. These are not dealbreakers for everyone, but they are worth knowing. I have also seen buyers try to fit two surge protectors in a single tray, which is outside the intended use case and puts you well over the weight ceiling. One strip per tray is the right approach.
What the Install Actually Looks Like (Step by Step)
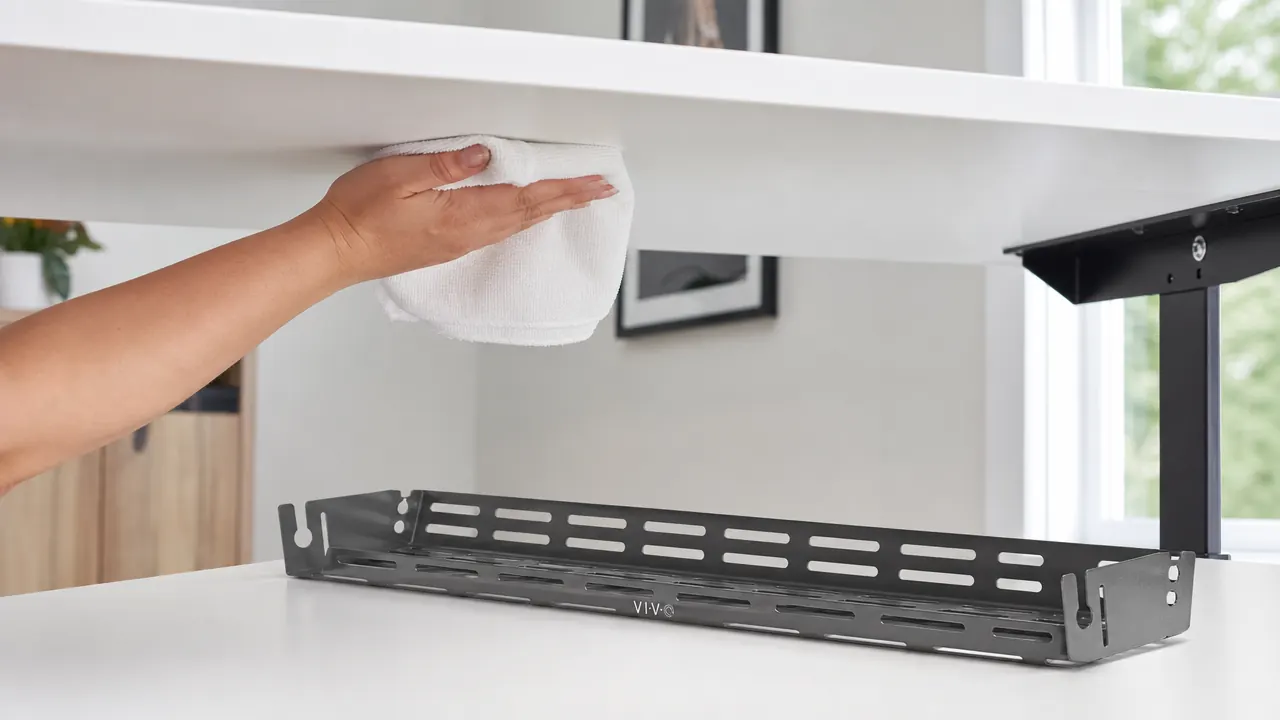
I want to give you the install sequence that accounts for all the variables above, not just the three-step version on the box. First, clean the mount area with a dry microfiber cloth, then follow with a light wipe of isopropyl alcohol on a fresh cloth. Let the surface air dry fully, at least two minutes. Second, warm the room to at least 65 degrees if it is winter. Third, decide your position before removing any adhesive backing. The tray mounts best about five to seven inches from the back edge of the desk, centered on width. Dry-fit it by holding it in place before peeling anything.
Fourth, peel the adhesive backing on all pads at once and press the tray firmly against the surface for a full minute. Use your palm and lean into it. Fifth, walk away for two full hours before loading any weight. The adhesive is pressure-sensitive and reaches about 50 percent cure strength in 20 minutes but does not hit full cure until the 24-hour mark. Loading a heavy surge protector at the 20-minute mark, which many buyers do, significantly increases the chance of early failure. I know waiting feels unnecessary but it is the single easiest thing you can do to guarantee a good result.
If you are working out a complete cable-hiding strategy for your whole desk, I covered the broader approach in detail in how to hide desk cables without drilling, including what to do with the cords after they leave the tray. For a direct comparison of whether a floor-level cable box makes more sense for your setup, the under-desk cable tray vs cable box breakdown walks through both options side by side.
Who Returns This Tray (And Why)
After reading through a wide sample of the 1- and 2-star reviews, the return pattern is clear. The majority of unhappy buyers fall into one of three groups. The first group installed on a textured melamine desk and saw the tray peel away within two to three weeks. The second group bought it for a very large or heavy power strip and found the tray undersized for their specific strip dimensions. The third group did not wait for the adhesive to cure and loaded the tray within minutes of mounting, then reported that it fell off overnight.
A smaller segment of returns comes from buyers who realized after receiving the product that their desk underside has a curved or angled profile near the back, which prevents the tray from sitting flush. This is a less common desk design but it does exist, particularly on some modern desk shapes with beveled edges. If your desk has any shaping on the underside near where you would mount a tray, this flat-back tray will not work.
What I Liked
- Adhesive is genuinely strong on smooth, clean, properly prepared surfaces and holds through multiple seasons without maintenance
- No drilling required, which means no damage for renters or people who might move desks
- Mesh basket design allows cables to enter and exit from any side, which makes routing flexible rather than forcing a single-entry setup
- Install can be done solo in under ten minutes once the surface is properly prepped
- Fits a standard six-outlet surge protector with clearance, which covers the majority of home office power setups
- Comes with a spare set of adhesive pads, which is a practical inclusion given that some surfaces may need reinforcement
Where It Falls Short
- Adhesive performs significantly worse on textured melamine, rough particleboard wraps, or any surface that has been treated with spray cleaners or furniture polish
- No stated weight limit on the product listing, which means buyers with heavier power strips have no guidance before they discover the limit through a failure
- Will not accommodate surge protectors longer than roughly 13 inches or wider than 4 inches without fit issues
- Temperature-sensitive cure means cold-climate installs in unheated rooms can result in partial bonding that feels strong at first but fails under load
- Plastic basket material flexes noticeably under hand pressure, which raises a question about long-term fatigue on heavier loads over years of use
Who This Is For
This tray is a strong fit for renters who cannot drill, remote workers who move their desk setup occasionally and want a clean removable solution, and anyone with a smooth-topped desk, whether laminate, glass, or finished hardwood, who has been putting off the cable cleanup job for too long. It works especially well as a companion to a monitor arm: once you have arms holding the screens, the tray takes care of the power strip and cable bundle, and suddenly the whole desk surface is clear. If you are setting up a new home office from scratch and want to wire it correctly the first time, this tray combined with a few cable clips along the desk legs gives you a genuinely professional-looking result in an afternoon.
Who Should Skip It
Skip this tray if your desk has a textured, rough, or unfinished underside. The adhesive will fight you from the start and you will spend more time troubleshooting than you save by avoiding the drill. Skip it if your power strip is longer than 13 inches or weighs more than 3 pounds on its own. Skip it if your home office is in a cold space that regularly runs below 60 degrees in winter, unless you are willing to heat the room during installation and the first 24-hour cure window. And skip it if your desk has any kind of curved, angled, or beveled underside profile near the back, because the tray needs a flat contact area to mount properly. For any of those situations, a screw-mounted tray or a J-channel cable raceway mounted to a desk leg will give you more reliable results without the surface-dependency concern.
Smooth desk, clean surface, standard power strip? This tray is the right call.
When the conditions are right, this is one of the fastest and most satisfying home office upgrades you can make. Check today's price on Amazon and confirm the dimensions match your setup before ordering.
Amazon Check Today's Price on Amazon →