
I spent the first six months with my GABRYLLY ergonomic chair sitting in exactly the same position I used with my old $80 task chair: height cranked up, lumbar support still in its factory position, armrests wherever they happened to be. My lower back still ached by 3 PM. I blamed the chair. Then I actually read the manual, spent about ten minutes running through each adjustment, and the difference was immediate enough that I felt a little embarrassed I had waited so long.
An ergonomic chair is not a passive piece of furniture. It is a system with five or six independent adjustments, and every one of them matters. A chair set up wrong for your body is sometimes worse than a plain chair, because it gives you the false confidence that you are already doing everything right. This guide walks through every adjustment in the order that makes sense: bottom-up, chair first, then desk and screen. If you have a GABRYLLY, the controls I describe match exactly. If you have a different ergonomic chair, the logic is the same even if the levers are in slightly different spots.
If your chair does not have all five of these adjustments, no setup guide will fix the gaps.
The GABRYLLY ergonomic mesh chair includes 3D armrests, adjustable lumbar depth, a recline tension knob, and a headrest. It is the chair I use for this guide and the one I recommend if you are still shopping.
Amazon Check Today's Price on Amazon →Step 1: Set Your Seat Height First
Seat height is the foundation. Get this wrong and every other adjustment compensates for it, usually poorly. The correct height puts your feet flat on the floor (or on a footrest) with your knees at roughly a 90-degree angle, maybe a few degrees more open. Your thighs should be roughly parallel to the floor, not angled up or down sharply.
Sit down and reach under the seat to pull the height lever. On the GABRYLLY, it is on the right side, a long paddle you pull up to lower and release to lock. Adjust until your feet are planted and you feel no pressure on the underside of your thighs from the seat edge. If you are between settings, err toward slightly higher rather than lower. You should be able to slide a couple of fingers under your thigh near the knee without effort. If your feet dangle even a little, add a footrest rather than dropping the seat to compensate, because lowering the seat too much closes your hip angle and puts more load on your lumbar discs.
If you are tall, verify that your knees clear the underside of the desk at the correct seat height. The GABRYLLY adjusts from 17.3 to 21.3 inches, which covers most people between 5 foot 2 and 6 foot 4 comfortably. I am 5 foot 11 and 185 lbs, and I sit at about 19.5 inches. Do not move on to the next step until seat height feels settled. It takes two minutes and changes everything else downstream.
Step 2: Position the Lumbar Support at the Curve of Your Lower Back
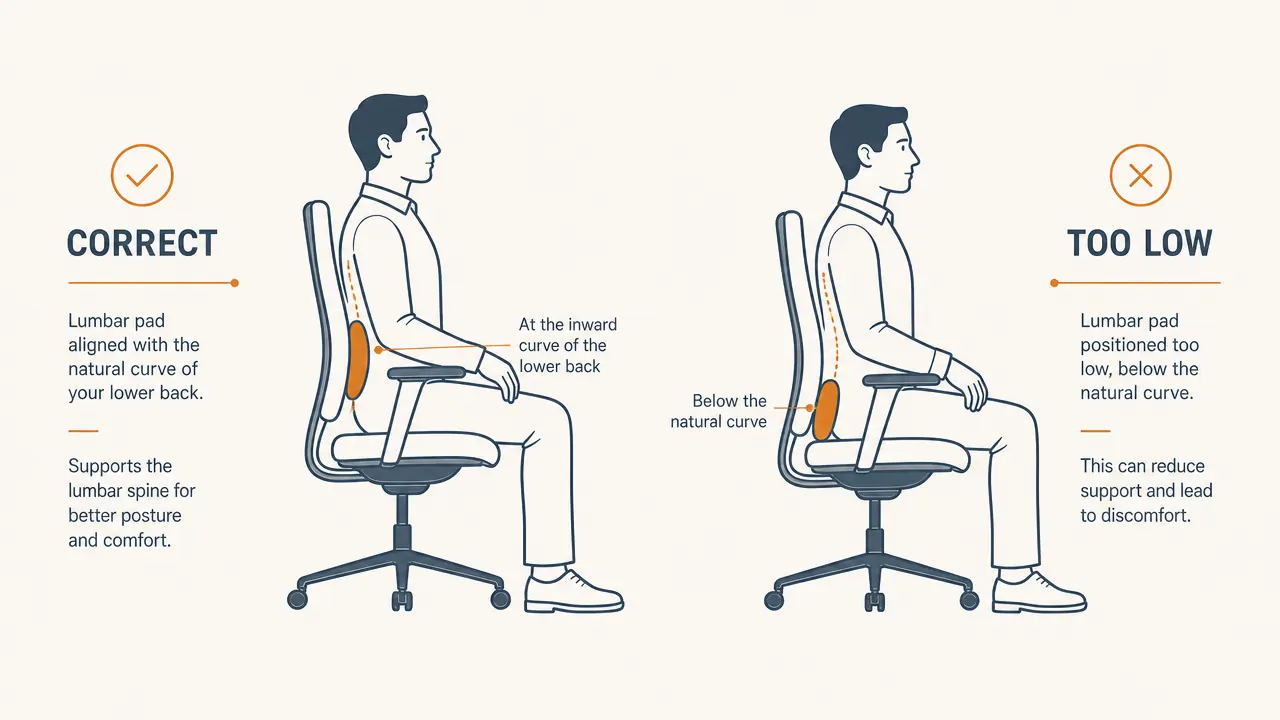
The lumbar support on an ergonomic chair is meant to fill the inward curve of your lower back, the spot just above your belt line where your spine bends forward. On most people that is roughly at the level of the third or fourth lumbar vertebra. The mistake almost everyone makes is leaving the lumbar pad too low, where it ends up pushing against the back of the pelvis instead of the spine's curve.
Sit back fully in the chair so your hips are against the backrest. Find the height adjustment for the lumbar on your chair. On the GABRYLLY, the lumbar support slides up and down inside the mesh backrest frame, and there is also a depth knob on the side that pushes it forward or back. Start by setting the height: slide it up until you feel it contact the small of your back, then back it off about half an inch. That position should fit right into the natural inward curve when you are sitting upright. If it presses hard against your back at rest, it is too high or too far forward.
Now dial in depth. Turn the lumbar depth knob clockwise slowly until the support makes gentle contact with your back at a neutral seated posture. You want support, not pressure. If the lumbar pad is pushing your upper body forward noticeably, back it off. The test: sit in a natural upright position and relax your back muscles slightly. The lumbar pad should catch you there without forcing you into a strained arch. Once set, do not touch it for a full workday and see how your lower back feels at the end. Adjust from there.
The lumbar pad should catch you when you relax slightly, not force you into a position you have to actively hold.
Step 3: Set Armrest Height, Width, and Angle
Armrests are the most ignored adjustment on most chairs, and they affect your neck and shoulders more than any other control. The goal is to have your forearms resting lightly on the pads while your shoulders stay down and relaxed, not hiked up toward your ears. If your armrests are too low, you unconsciously shrug to type, which loads your trapezius muscles for hours at a stretch. If they are too high, they push your shoulders up and create the same problem.
On the GABRYLLY, the armrests adjust in three dimensions: height, width, and pivot angle. Start with height. Sit at your desk with your hands at the keyboard. Adjust the armrest height until your forearms rest parallel to the floor, or just a few degrees below, with no shrug in your shoulders. Lock it there. Next adjust width: bring the armrests inward until they are close to your torso without forcing your elbows in. You want your upper arms hanging naturally from your shoulders, not winging out. Finally, angle the pad itself if your chair supports it. A slight inward pivot, around 10 to 15 degrees, tends to feel natural for most typing positions.
One thing people miss: check that the armrests do not stop you from pulling the chair fully under the desk. If the armrests catch on the desk edge, you end up sitting further away than you should, and you compensate by leaning forward, which defeats everything else you have just set up. On the GABRYLLY, the armrests can be folded forward slightly or pulled inward to clear most standard desks. Spend a minute confirming the fit before moving on.

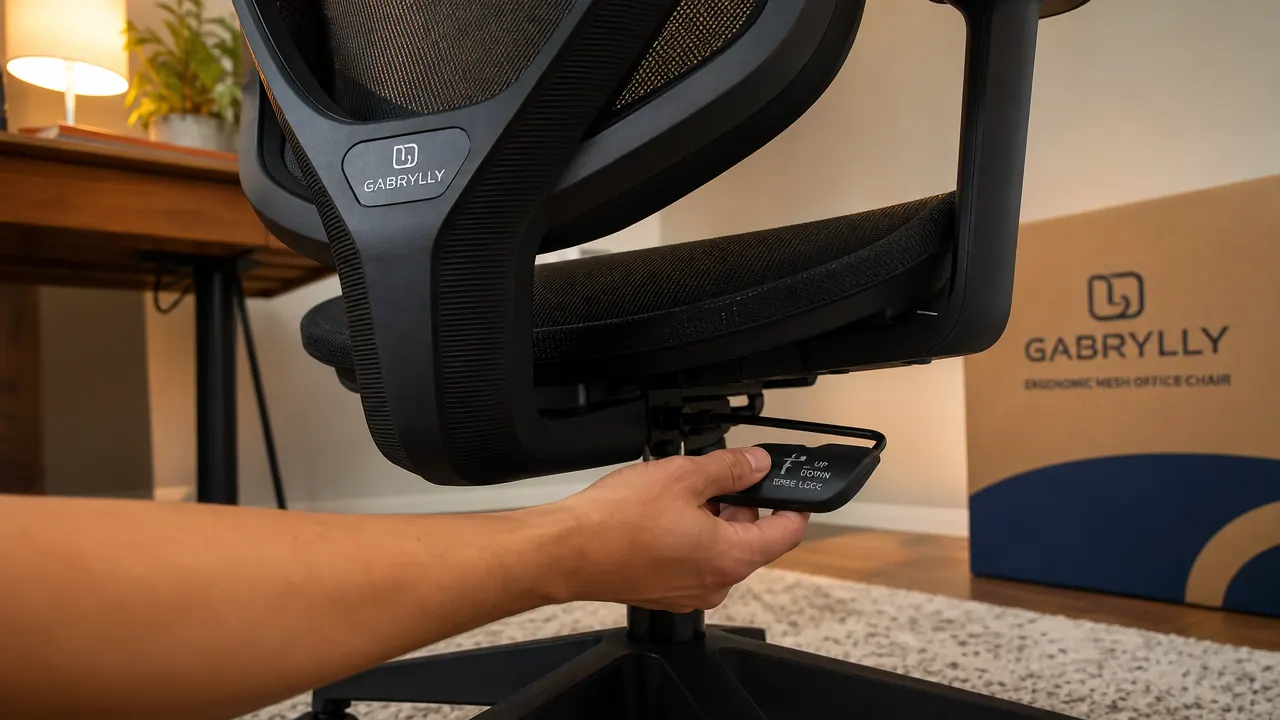
Step 4: Adjust Recline Tension So Leaning Back Feels Controlled
Most people either lock their chair completely upright and never recline, or leave the recline totally loose so the chair flops back every time they shift. Neither is right. A properly tensioned recline gives you a small range of dynamic movement throughout the day, which reduces fatigue far better than holding one rigid position for hours.
The recline tension knob is usually under the seat at the center. On the GABRYLLY, it is a round knob you turn clockwise to increase resistance and counterclockwise to decrease it. Sit down and lean back naturally. The chair should begin to move when you apply moderate pressure, around the same effort as taking a deep breath and stretching your arms overhead. If the chair reclines the moment you shift your weight, tighten the tension. If you are straining to get any reclining at all, loosen it.
The GABRYLLY also has a tilt lock if you want to hold a specific recline angle during calls or focused work. For most home office workers, I recommend setting the tension appropriately and leaving the tilt lock off during the workday. The micro-movements you get from a properly tensioned recline keep blood flowing to your back muscles and reduce the compression that builds up from pure static sitting. Save the lock for situations where you genuinely need to hold still, like video presentations.
Step 5: Align Your Desk and Monitor to Match the Chair Setup
The chair is only half the equation. Once the chair is dialed in, your desk and monitor need to align with it, not the other way around. This is where most home office workers leave performance on the table: they spend money on a good chair, set it up correctly, and then crane their neck forward to see a monitor that is six inches too low.
With your chair set correctly, sit in your natural working position, eyes forward. The top of your monitor should be at or very slightly below eye level. If it is lower, you will tilt your head forward, and that forward tilt adds around 40 to 60 pounds of effective load on your cervical spine over a long day. If you are on a laptop or your monitor is sitting flat on the desk, raise it on a stand or a stack of books and use an external keyboard and mouse. The monitor should also be about an arm's length away from your face when you are seated in the chair at a natural working distance.
Your keyboard and mouse should sit at the same height as your armrests, or within about an inch. If your desk is fixed height and your armrests end up higher than the keyboard, lower the armrests slightly so they guide your arms down toward the keyboard rather than lifting them away from it. The wrist should be flat or just slightly low as you type, not bent upward. If you find yourself with forearms on the desk edge a lot, the desk is probably too high for your current chair height, and you should consider a keyboard tray rather than dropping the chair height, which will compromise your leg position.
What Else Helps
Getting the chair right is the largest single lever, but it works best alongside a few other habits. Take a standing break for two to five minutes every 45 to 60 minutes. Set a timer if you have to. Walk to get water, do some shoulder rolls at your desk, anything that breaks the static load on your spine. No chair, regardless of how well it is adjusted, eliminates the accumulated fatigue of sitting still for four hours straight. Pair your adjusted ergonomic chair with regular movement and you will notice a real difference in how you feel at the end of the day compared to trying either one alone. A footrest, if your feet do not reach the floor comfortably after height adjustment, makes a bigger difference than most people expect. And anti-fatigue mats are worth it if you mix in standing time.
The GABRYLLY has every adjustment this guide covers, and it ships fully assembled.
3D armrests, adjustable lumbar depth and height, recline tension control, and a mesh back that breathes through long summer workdays. Rated 4.5 stars across more than 1,400 reviews. If your current chair does not give you this much to work with, this is a good place to land.
Amazon Check Today's Price on Amazon →